SKU: OT6745 Número de artículo: XV193 EAN: 8720828223635

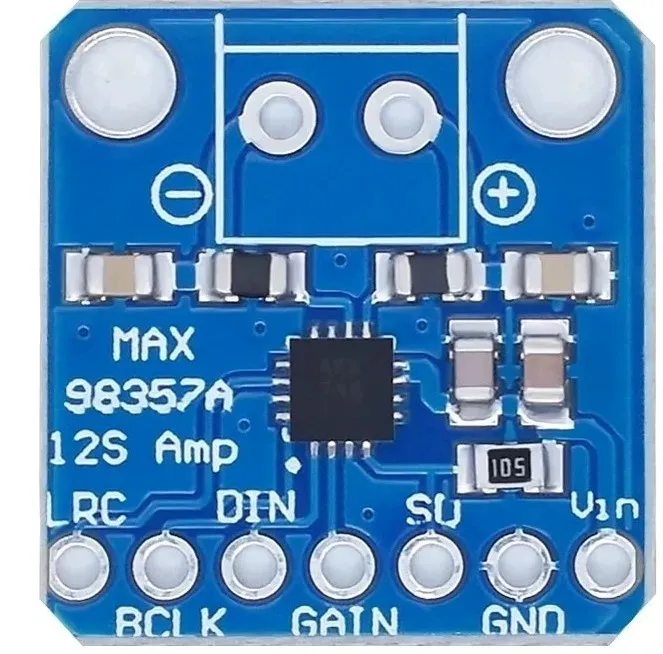
Si buscas una forma fácil y asequible de amplificar tus archivos de audio digitales, el MAX98357 I2S Amp Breakout es para ti. Toma la entrada de audio digital I2S estándar y no solo la decodifica a analógica, sino que también la amplifica directamente para un altavoz. Perfecto para añadir sonido amplificado compacto, combina 2 break-outs (I2S DAC + Amp) en uno.
I2S es un protocolo de sonido digital que se utiliza en placas de desarrollo para transmitir datos de audio. Muchos chips y procesadores avanzados gestionan todo el audio en formato digital I2S. Para introducir o sacar datos, se utilizan tres o cuatro pines (entrada de datos, salida de datos, reloj de bits y selección de canal izquierda-derecha). Normalmente, para los dispositivos de audio hay un chip DAC que se comunica con I2S y lo convierte a analógico para poder alimentar unos auriculares.
Este pequeño amplificador mono es sorprendentemente potente: puede entregar 3.2 vatios de potencia a un altavoz con una impedancia de 4 ohm (con alimentación de 5V y 10% THD). En el chip en miniatura hay un controlador de clase D, que funciona con una tensión de alimentación de 2.7V-5.5VDC. Como el amplificador es de clase D, es extraordinariamente eficiente, por lo que es perfecto para proyectos portátiles y alimentados por batería. Tiene protección térmica y contra sobrecorriente integradas, pero apenas notamos que se calentara.
La entrada de audio es estándar I2S, puedes usar datos lógicos de 3.3V o 5V. Las salidas son "Bridge Tied", lo que significa que se conectan directamente a las salidas, sin conexión a tierra. La salida es una onda cuadrada PWM de ~300KHz que luego es 'promediada' por la bobina del altavoz: las altas frecuencias no se oyen. Todo lo anterior significa que no puedes conectar la salida a otro amplificador, debe accionar directamente los altavoces.
Hay un pin Gain que puede ajustarse para cambiar la ganancia. De forma predeterminada, el amplificador te ofrece 9 dB de ganancia. Conectando una resistencia pull-up o pull-down, o cableándolo directamente, el pin Gain puede configurarse en 3 dB, 6 dB, 9 dB, 12 dB o 15 dB.
El pin ShutDown/Mode puede utilizarse para poner el chip en modo de suspensión o para establecer qué canal de audio I2S se envía al altavoz. De forma predeterminada, el amplificador emite una mezcla estéreo (L+R)/2 a la salida mono. Añadiendo una resistencia, puedes cambiarlo para que salga solo el canal izquierdo o solo el derecho.
Especificaciones:
Así conectas el I2S DAC con amplificador de 3W - MAX98357A a un Arduino UNO o ESP32, con un sketch de ejemplo que puedes subir directamente.
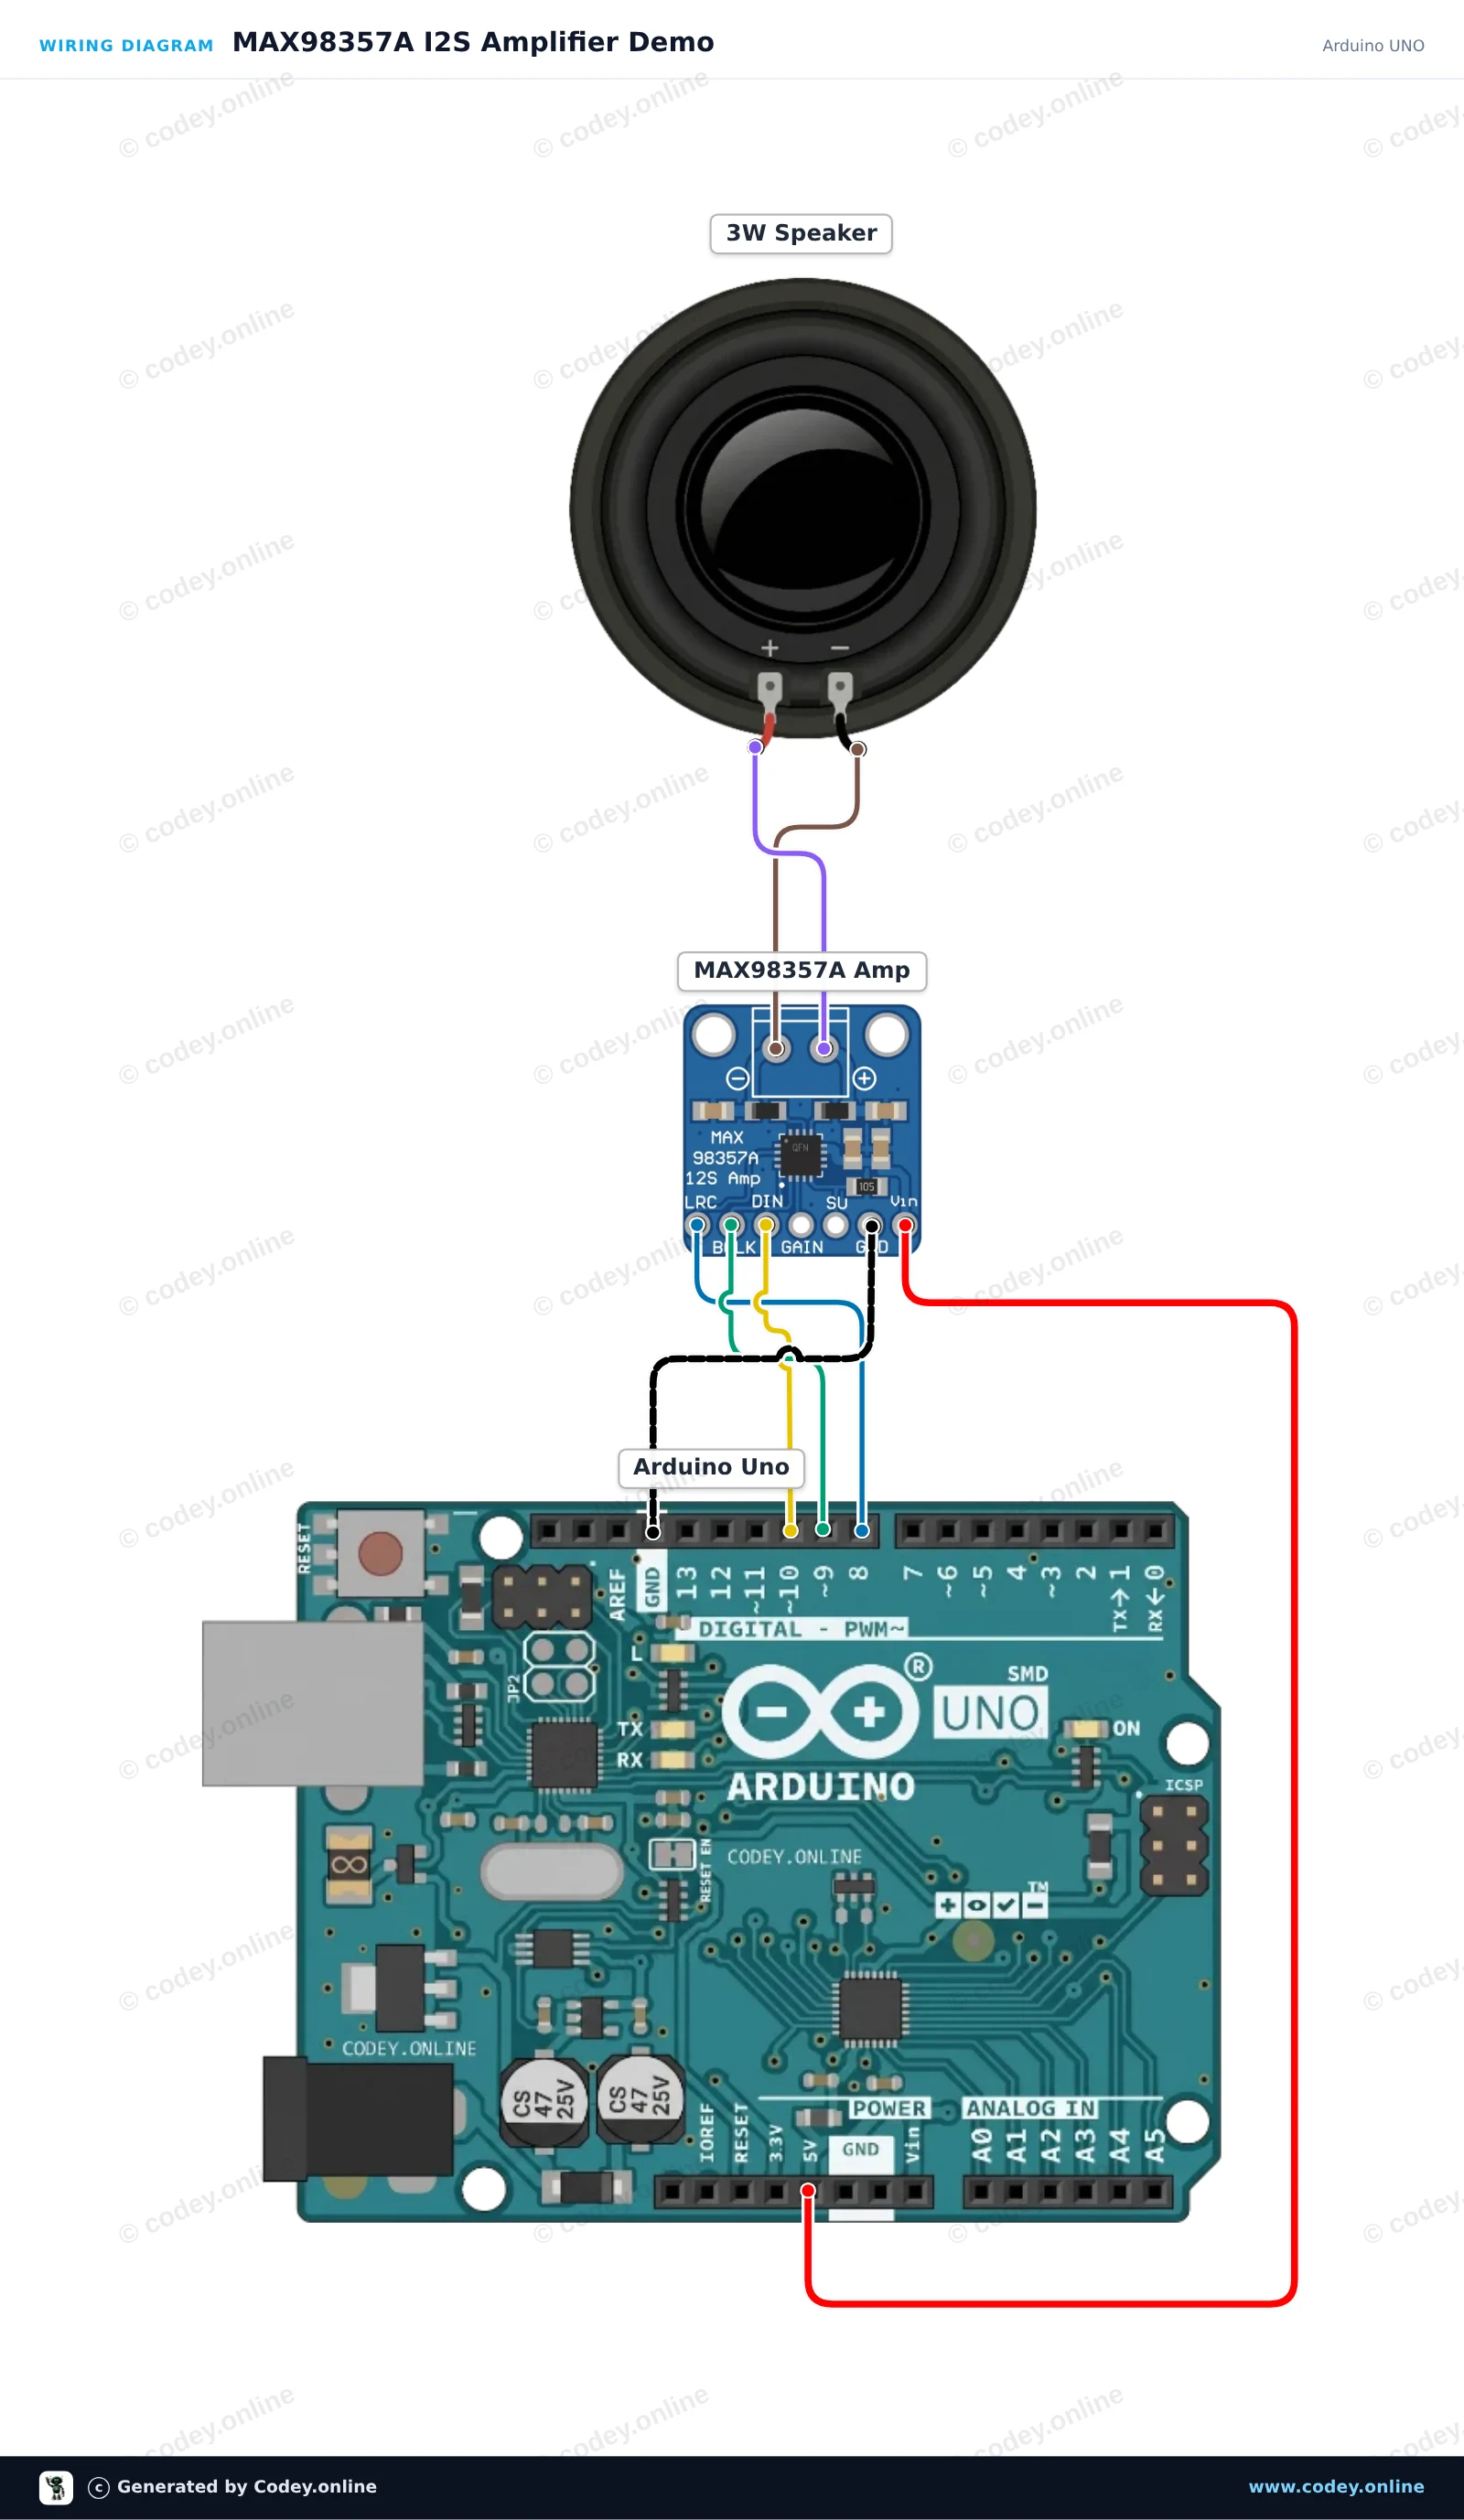
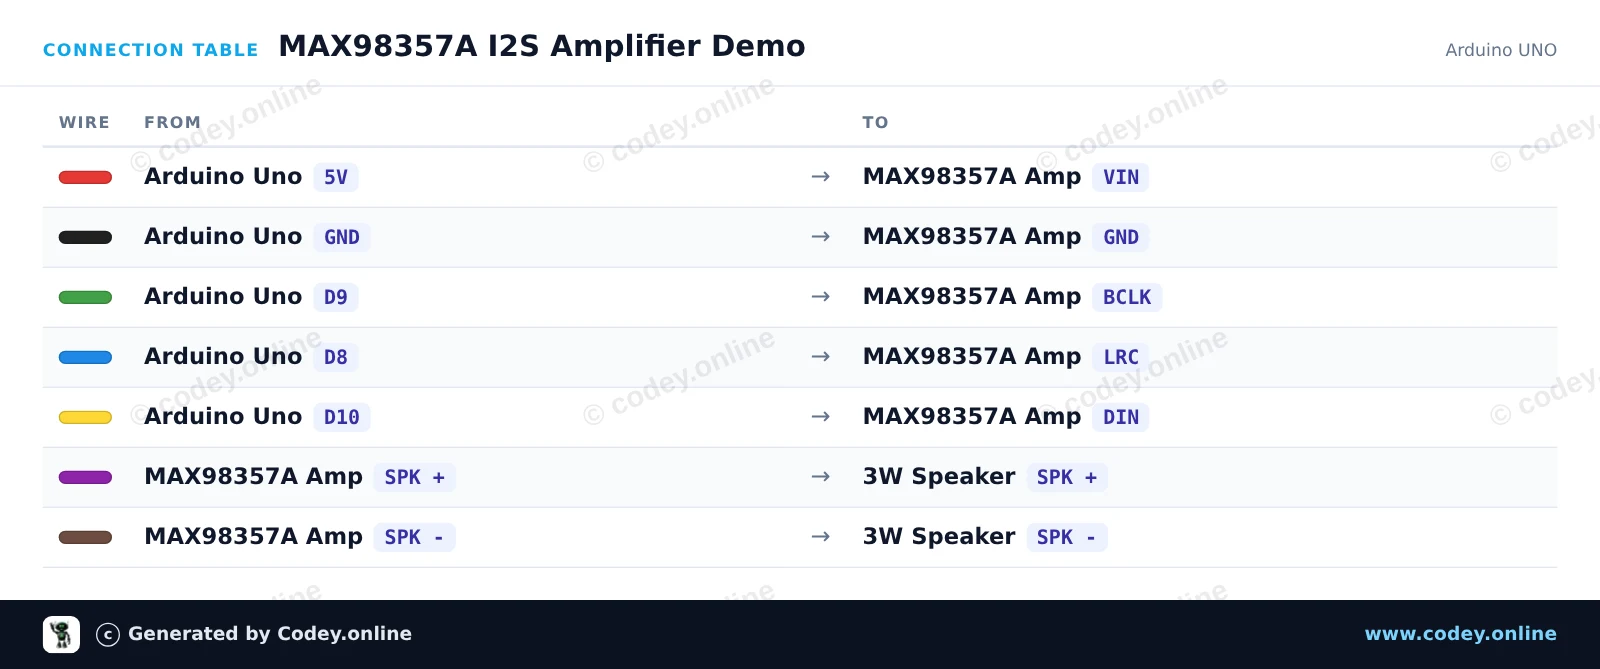
Este proyecto muestra el amplificador I2S MAX98357A conectado a un Arduino Uno y a un altavoz de 3W. Como el Arduino Uno basado en AVR no dispone de un periférico I2S nativo, el sketch demuestra el cableado de la interfaz alternando los pines de control y datos y mostrando mensajes de estado en el Serial Monitor a 115200 baud.
/*
 * ==================================================================
 *  Generated by Codey.online  —  https://www.codey.online
 * ==================================================================
 *  Project   : MAX98357A I2S Amplifier Demo
 *  Board     : Arduino UNO (arduino:avr:uno)
 *  Parts     : 3W amplifier MAX98357A I2S DAC
 *  Libraries : none (built-in)
 *
 *  Codey Online is an AI-powered browser IDE for Arduino and ESP32.
 *  Describe your project and Codey writes the code, draws the wiring
 *  diagram and uploads it to your board, straight from the browser.
 *  This code is free to use, modify and share, without warranty.
 * ==================================================================
 */

// MAX98357A I2S Amplifier wiring and basic test sketch
// Note: AVR Arduino Uno does not have hardware I2S.
// This sketch verifies pin connections and demonstrates signal pulsing.

const uint8_t PIN_BCLK = 9;
const uint8_t PIN_LRC  = 8;
const uint8_t PIN_DIN  = 10;

const unsigned int toneHz = 440;
const unsigned long toneOnMs = 1000;
const unsigned long toneOffMs = 500;

void outputPulse(unsigned long durationMs, unsigned int frequencyHz) {
  unsigned long start = millis();
  unsigned long halfPeriodUs = 500000UL / frequencyHz;

  while (millis() - start < durationMs) {
    digitalWrite(PIN_DIN, HIGH);
    delayMicroseconds(halfPeriodUs);
    digitalWrite(PIN_DIN, LOW);
    delayMicroseconds(halfPeriodUs);
  }
}

void setup() {
  pinMode(PIN_BCLK, OUTPUT);
  pinMode(PIN_LRC, OUTPUT);
  pinMode(PIN_DIN, OUTPUT);

  digitalWrite(PIN_BCLK, LOW);
  digitalWrite(PIN_LRC, LOW);
  digitalWrite(PIN_DIN, LOW);

  Serial.begin(115200);
  Serial.println(F("MAX98357A Amplifier Test"));
  Serial.println(F("Pins initialized: BCLK=9, LRC=8, DIN=10"));
}

void loop() {
  Serial.println(F("Signal ON (440 Hz pulse)"));
  outputPulse(toneOnMs, toneHz);

  Serial.println(F("Signal OFF"));
  digitalWrite(PIN_DIN, LOW);
  delay(toneOffMs);
}Wiring diagram and example code generated by Codey.online — https://www.codey.online
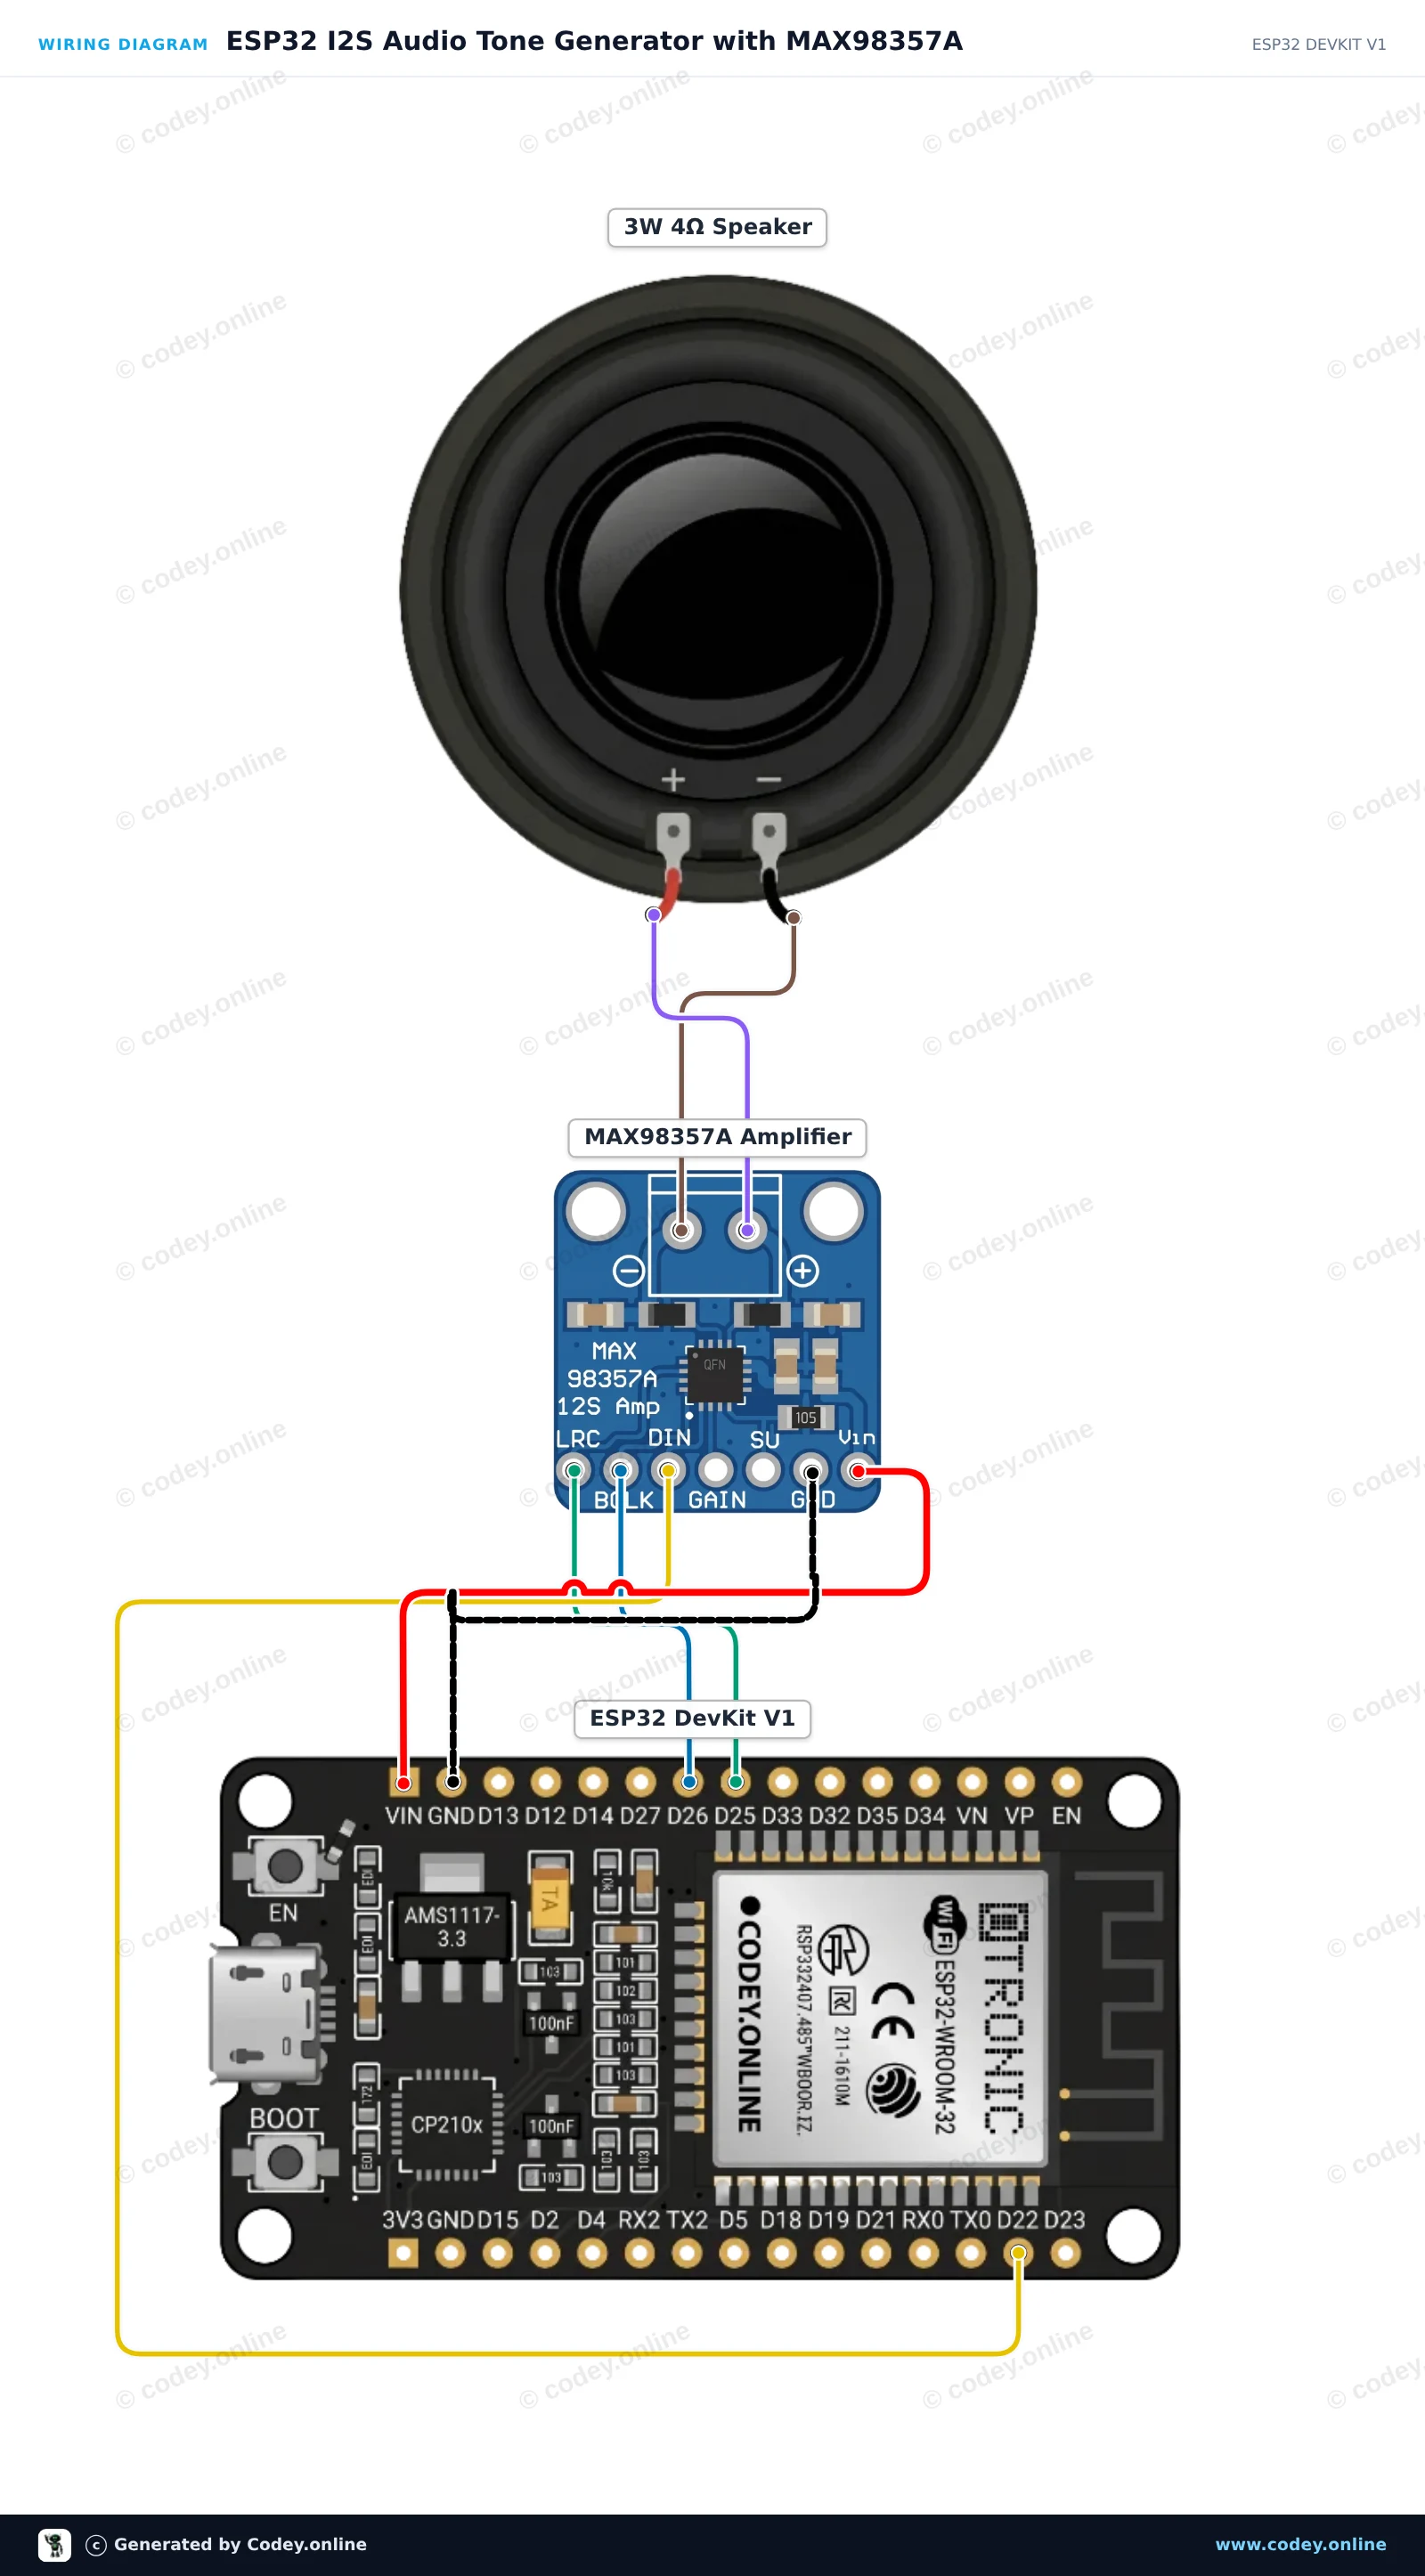
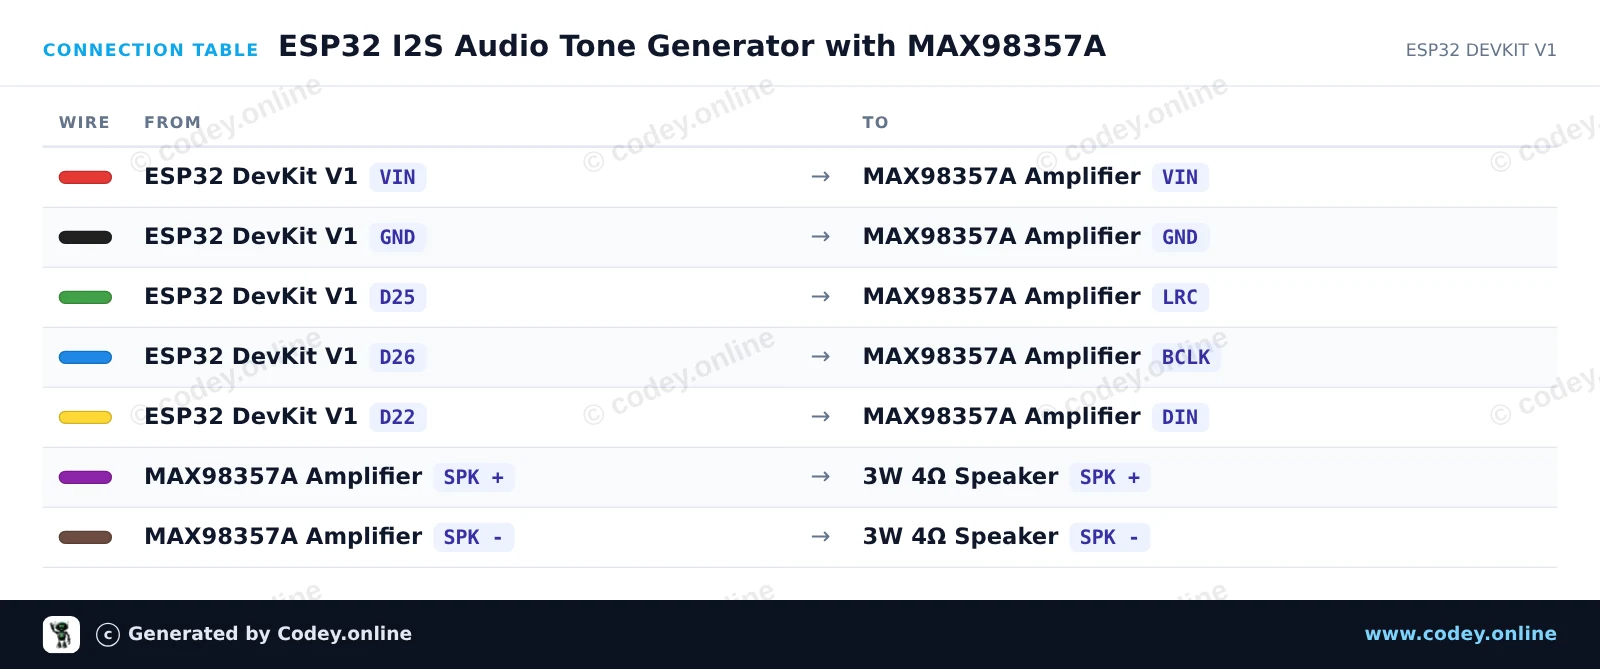
Este proyecto reproduce tonos de audio alternados a través de un altavoz de 3W usando el amplificador de audio digital I2S MAX98357A. El ESP32 sintetiza audio PCM de 16-bit en tiempo real y lo transmite por el bus I2S directamente al amplificador DAC.
/*
 * ==================================================================
 *  Generated by Codey.online  —  https://www.codey.online
 * ==================================================================
 *  Project   : ESP32 I2S Audio Tone Generator with MAX98357A
 *  Board     : ESP32 DEVKIT V1 (esp32:esp32:esp32doit-devkit-v1)
 *  Parts     : 3W amplifier MAX98357A I2S DAC
 *  Libraries : none (built-in)
 *
 *  Codey Online is an AI-powered browser IDE for Arduino and ESP32.
 *  Describe your project and Codey writes the code, draws the wiring
 *  diagram and uploads it to your board, straight from the browser.
 *  This code is free to use, modify and share, without warranty.
 * ==================================================================
 */

#include <Arduino.h>
#include "driver/i2s.h"
#include <math.h>

#define I2S_BCLK 26
#define I2S_LRC  25
#define I2S_DIN  22

#define SAMPLE_RATE 44100

void setup() {
  Serial.begin(115200);

  i2s_config_t i2s_config = {
    .mode = (i2s_mode_t)(I2S_MODE_MASTER | I2S_MODE_TX),
    .sample_rate = SAMPLE_RATE,
    .bits_per_sample = I2S_BITS_PER_SAMPLE_16BIT,
    .channel_format = I2S_CHANNEL_FMT_RIGHT_LEFT,
    .communication_format = I2S_COMM_FORMAT_STAND_I2S,
    .intr_alloc_flags = ESP_INTR_FLAG_LEVEL1,
    .dma_buf_count = 8,
    .dma_buf_len = 64,
    .use_apll = false,
    .tx_desc_auto_clear = true
  };

  i2s_pin_config_t pin_config = {
    .bck_io_num = I2S_BCLK,
    .ws_io_num = I2S_LRC,
    .data_out_num = I2S_DIN,
    .data_in_num = I2S_PIN_NO_CHANGE
  };

  i2s_driver_install(I2S_NUM_0, &i2s_config, 0, NULL);
  i2s_set_pin(I2S_NUM_0, &pin_config);

  Serial.println("MAX98357A I2S Tone Generator Ready!");
}

void playTone(float freq, int durationMs) {
  int totalSamples = (SAMPLE_RATE * durationMs) / 1000;
  size_t bytesWritten;
  int16_t buffer[128];

  float phaseStep = 2.0 * PI * freq / SAMPLE_RATE;
  float phase = 0.0;

  int samplesRemaining = totalSamples;
  while (samplesRemaining > 0) {
    int toWrite = min(64, samplesRemaining);
    for (int i = 0; i < toWrite; i++) {
      int16_t sample = (int16_t)(sin(phase) * 6000.0);
      buffer[i * 2] = sample;     // Left channel
      buffer[i * 2 + 1] = sample; // Right channel
      phase += phaseStep;
      if (phase >= 2.0 * PI) phase -= 2.0 * PI;
    }
    i2s_write(I2S_NUM_0, buffer, toWrite * sizeof(int16_t) * 2, &bytesWritten, portMAX_DELAY);
    samplesRemaining -= toWrite;
  }
}

void loop() {
  Serial.println("Playing 440 Hz (A4)...");
  playTone(440.0, 400);
  delay(100);

  Serial.println("Playing 880 Hz (A5)...");
  playTone(880.0, 400);
  delay(1000);
}Wiring diagram and example code generated by Codey.online — https://www.codey.online





 English
  Nederlands
  Frans
Frans  Deutsch
  Italiano
  Suomi
Suomi  Polski
  Dansk
Dansk  Ελληνικά
  Български
  Čeština
  Hrvatski
  Svenska
  Aileen