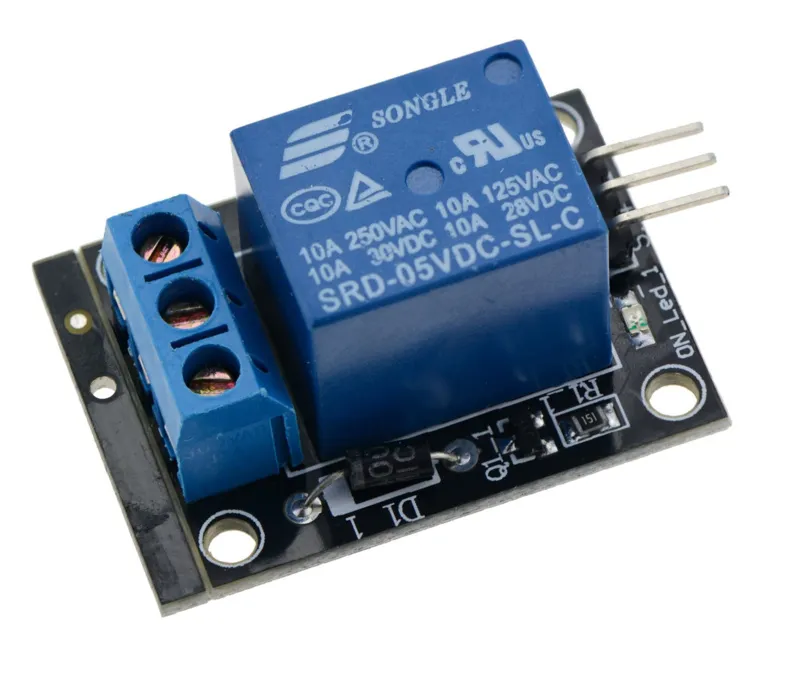
SKU: OT961-C105 Número de artículo: YP924 EAN: 4639867568390

Términos de búsqueda: relais 5v, 5v relais, relay 5v, 5v relay, relais hoog, relais high, relay high, blauwe relais, relais blauw, relais 250v, relais 220v, relais voor arduino, arduino relais, relais breadboard
Dimensiones
Longitud: 3,3cm
Anchura: 2,6cm
Altura: 1,7cm
Así conectas el Módulo de relé 5v para Arduino a un Arduino UNO o ESP32, con un sketch de ejemplo que puedes subir directamente.
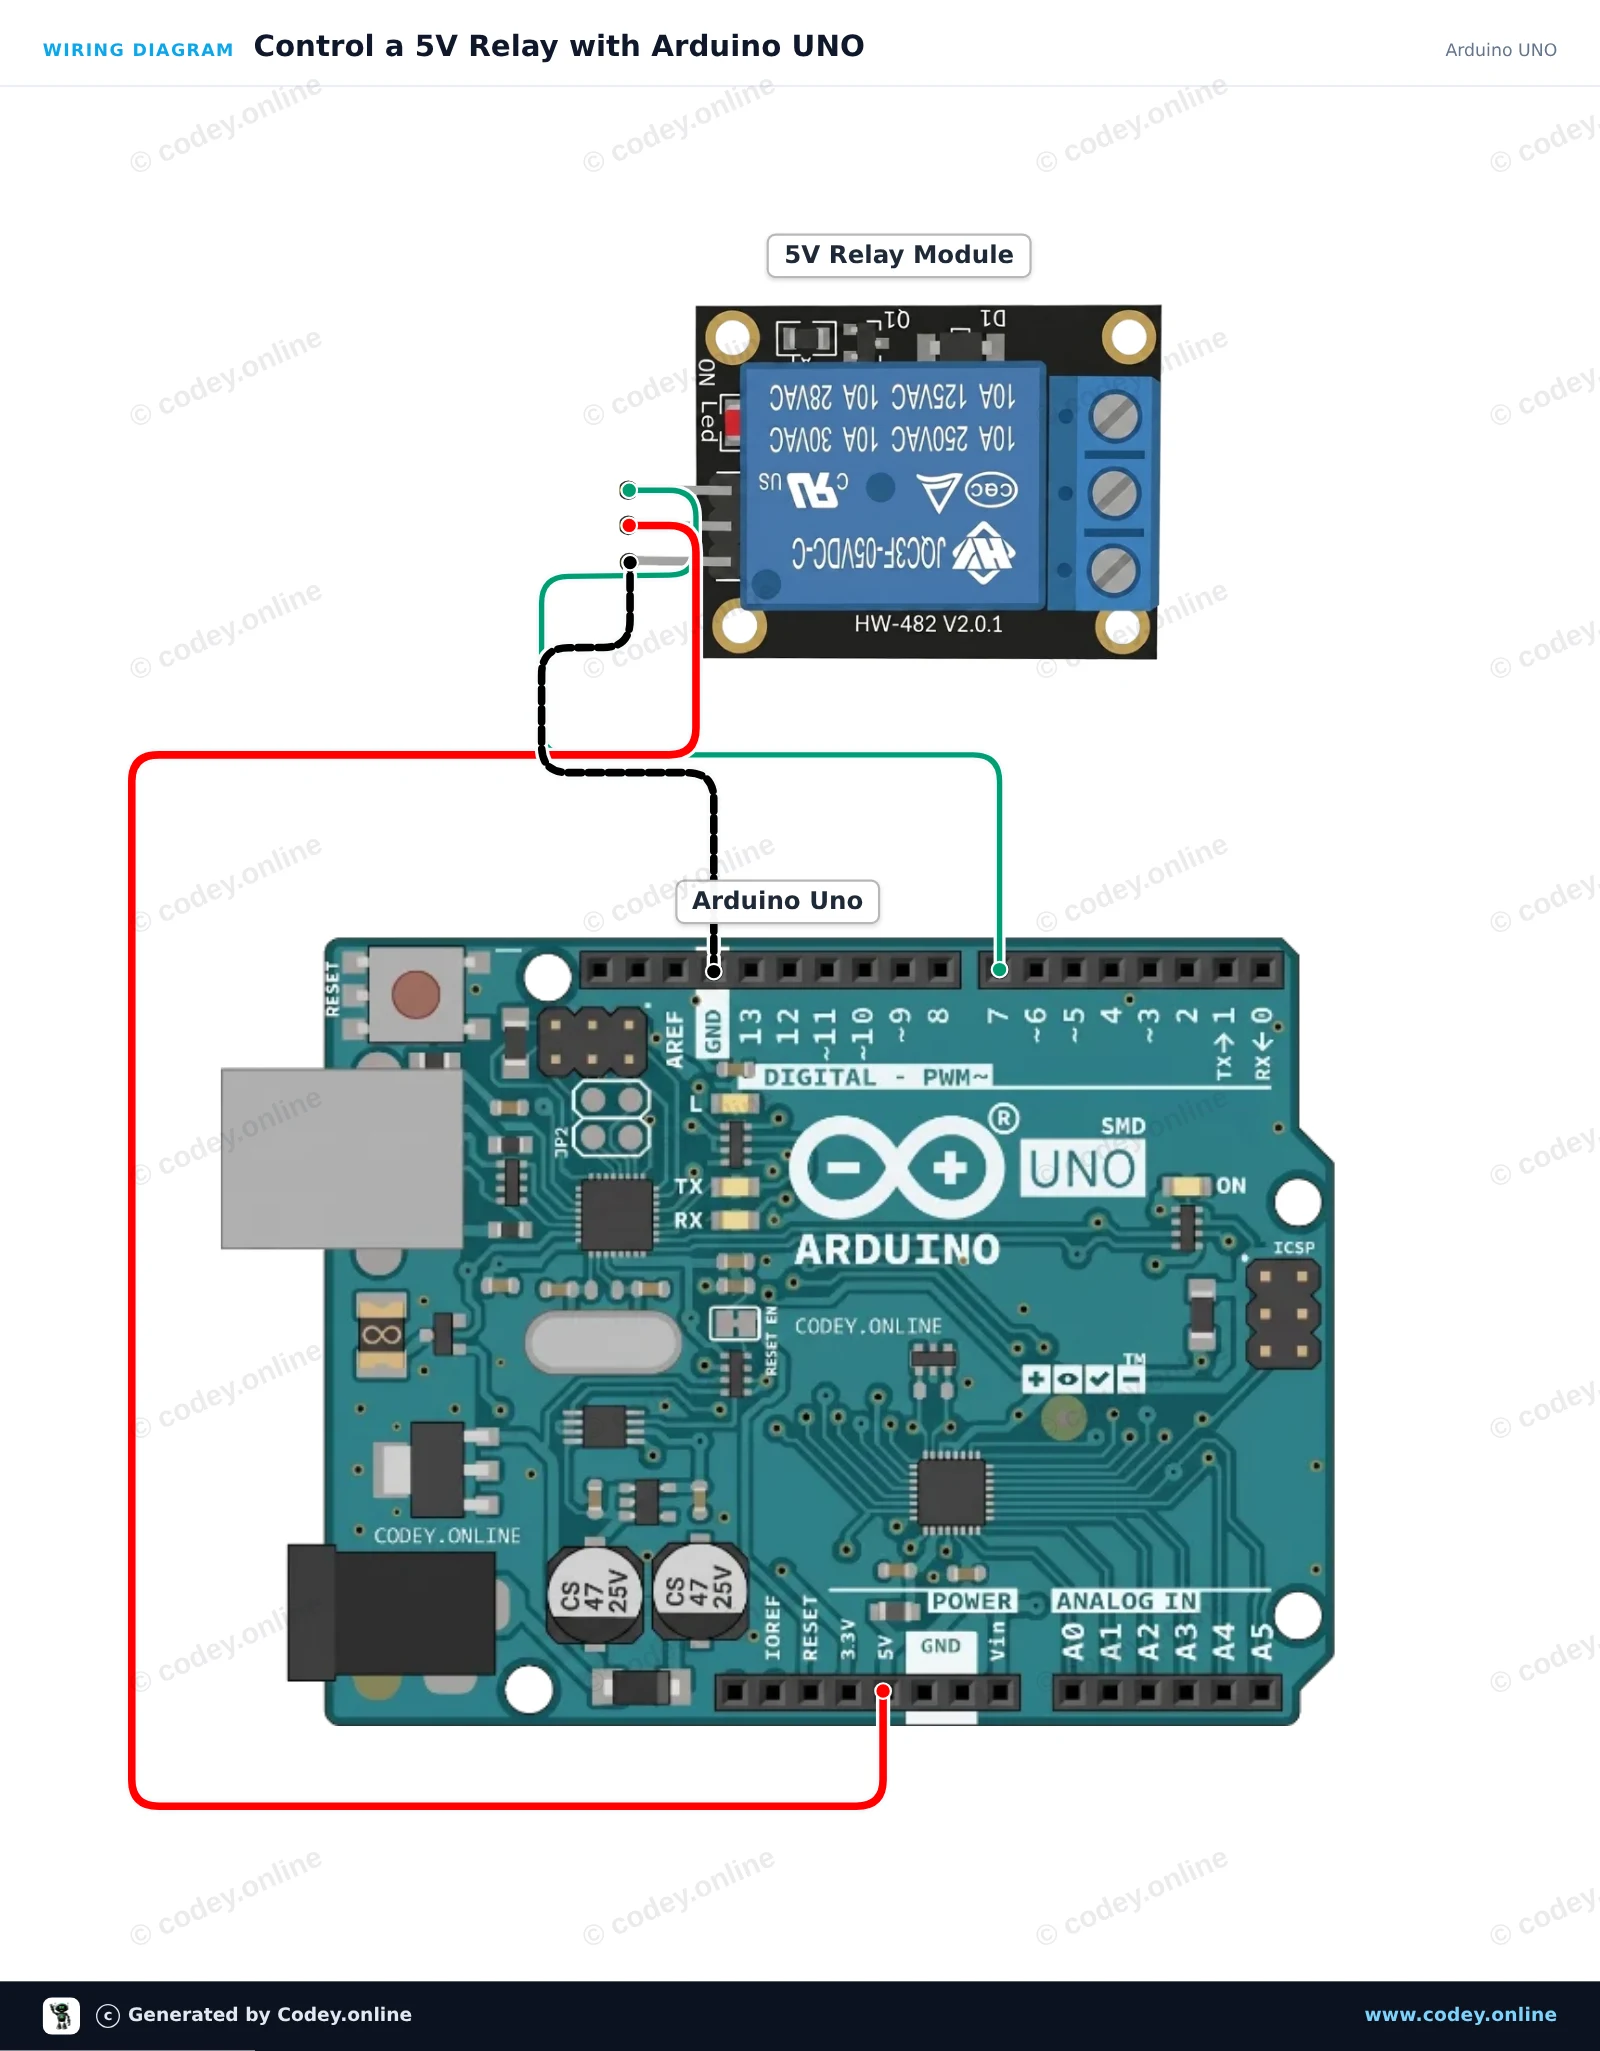
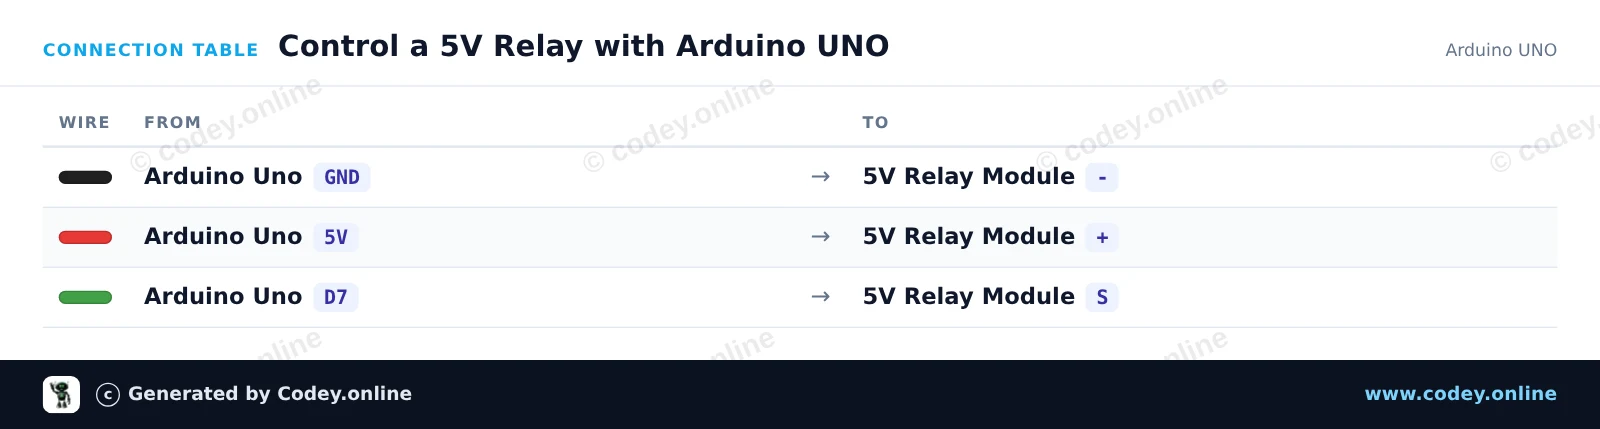
Este proyecto muestra cómo controlar un módulo de relé de 5V con un Arduino UNO. El sketch alterna el relé ON y OFF cada dos segundos mientras imprime el estado en el Serial Monitor. Escucharás un clic audible del relé cada vez que cambie de estado.
/*
 * ==================================================================
 *  Generated by Codey.online  —  https://www.codey.online
 * ==================================================================
 *  Project   : Control a 5V Relay with Arduino UNO
 *  Board     : Arduino UNO (arduino:avr:uno)
 *  Parts     : Relay Module 5V
 *  Libraries : none (built-in)
 *
 *  Codey Online is an AI-powered browser IDE for Arduino and ESP32.
 *  Describe your project and Codey writes the code, draws the wiring
 *  diagram and uploads it to your board, straight from the browser.
 *  This code is free to use, modify and share, without warranty.
 * ==================================================================
 */

// 5V Relay Module Example
const int RELAY_PIN = 7;

void setup() {
  pinMode(RELAY_PIN, OUTPUT);
  Serial.begin(115200);
  Serial.println(F("Relay module demo started."));
}

void loop() {
  // Turn relay ON
  digitalWrite(RELAY_PIN, HIGH);
  Serial.println(F("Relay: ON"));
  delay(2000);

  // Turn relay OFF
  digitalWrite(RELAY_PIN, LOW);
  Serial.println(F("Relay: OFF"));
  delay(2000);
}Wiring diagram and example code generated by Codey.online — https://www.codey.online
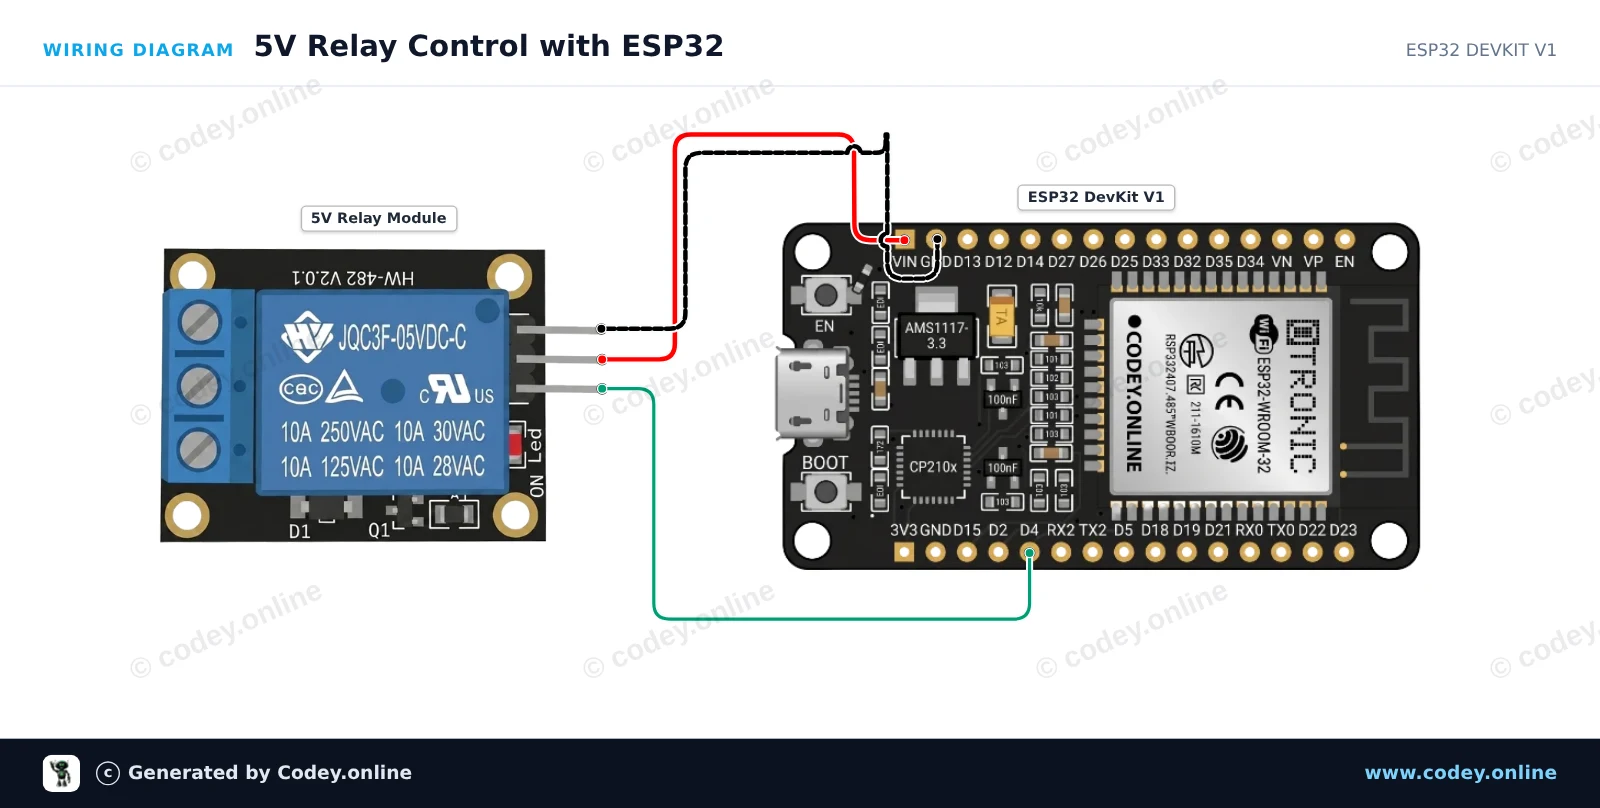
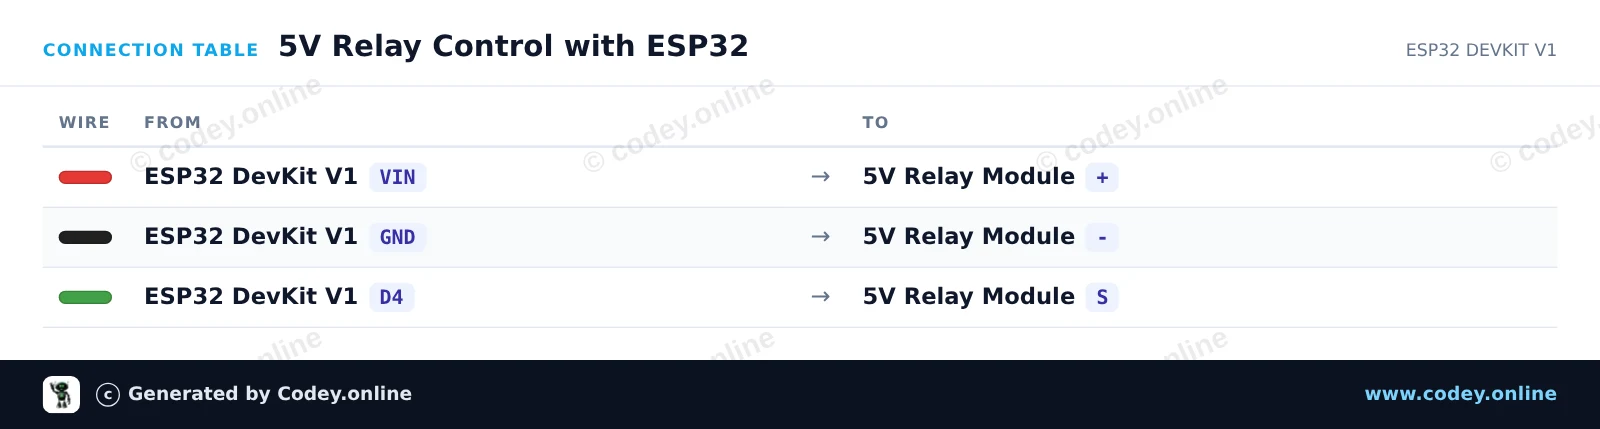
Este proyecto demuestra cómo controlar un módulo relé de 5V usando un ESP32. El relé se enciende y se apaga cada dos segundos mientras imprime su estado en el Serial Monitor. El relé se alimenta directamente desde el pin VIN del ESP32 (5V desde USB) y se activa mediante GPIO 4.
/*
 * ==================================================================
 *  Generated by Codey.online  —  https://www.codey.online
 * ==================================================================
 *  Project   : 5V Relay Control with ESP32
 *  Board     : ESP32 DEVKIT V1 (esp32:esp32:esp32doit-devkit-v1)
 *  Parts     : Relay Module 5V
 *  Libraries : none (built-in)
 *
 *  Codey Online is an AI-powered browser IDE for Arduino and ESP32.
 *  Describe your project and Codey writes the code, draws the wiring
 *  diagram and uploads it to your board, straight from the browser.
 *  This code is free to use, modify and share, without warranty.
 * ==================================================================
 */

// 5V Relay Control Example for ESP32
const int RELAY_PIN = 4;

void setup() {
  Serial.begin(115200);
  pinMode(RELAY_PIN, OUTPUT);
  digitalWrite(RELAY_PIN, LOW);
  Serial.println("Relay control initialized.");
}

void loop() {
  // Turn relay ON (Active HIGH for standard modules)
  Serial.println("Relay: ON");
  digitalWrite(RELAY_PIN, HIGH);
  delay(2000);

  // Turn relay OFF
  Serial.println("Relay: OFF");
  digitalWrite(RELAY_PIN, LOW);
  delay(2000);
}Wiring diagram and example code generated by Codey.online — https://www.codey.online





 English
  Nederlands
  Frans
Frans  Deutsch
  Italiano
  Suomi
Suomi  Polski
  Dansk
Dansk  Ελληνικά
  Български
  Čeština
  Hrvatski
  Aileen